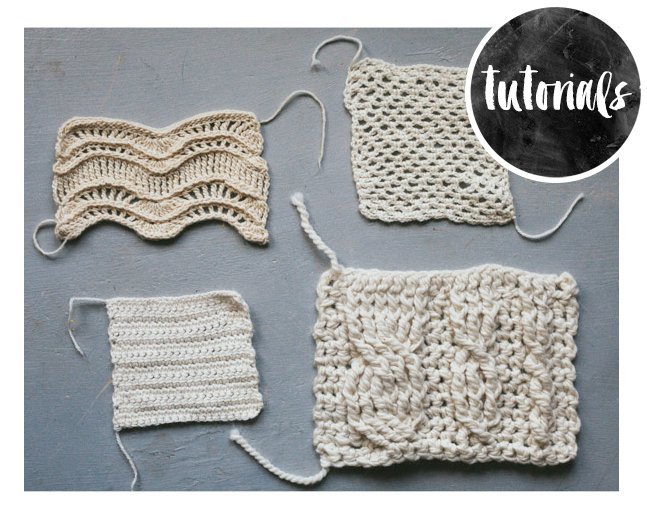
things you may not have known about scotland

Well, I am just chuffed to bits that people so far and wide are looking at the blog! I love writing it and love that people might take some small interest in my small corner of life. Anyway, it got me thinking about things that I didn’t know about Scotland before I lived here:

1. People really say “Bonnie”, as in the Bonnie Banks of Loch Lomond . It means beautiful.

2. Haggis is made from offal. Heart, liver, lungs of sheep, plus oats or barely, spices and lard, stuffed in an animal stomach and boiled. It is surprisingly tasty

3. Not everyone who was born and raised in Scotland has a Scottish accent. Some people have English accents and they live all over the country, not just near the border. They tend to be posh and went to boarding school.

4. People in Glasgow are the friendliest people you will ever meet in the Western world. Hesitate for a moment at a junction, someone will ask if you need help with directions. Walk into a pub and everyone has something to say to you.

As an aside, as of yesterday if you searched for “worst mother in the world” my blog comes 6th…it would be funny if some of the other results weren’t so awful.

P1040337

with 2 Comments

Only Thumbs

DSC00144#2

Well, I seem to be unable to do anything at the minute.  I have been up since 4, and have achieved NOTHING! But worse than that, I have caused complete carnage with everything I have done.  No really. 

1. I waxed my own eyebrows.  I don't need to say anything else other than,
do not expect any pictures of my face for about 6 weeks.  If I do see
you in person,  no, I am not giving you a quizzical look.

2. I have sustained a catalogue of injuries, including, but not limited
to: hitting my head on the corner of the kitchen table, stabbing a fork
into my forearm, burning myself on the stove,  having a door slammed
into my back, pulling a muscle in my neck and discovering a huge bruise
on my thigh…that was all before 11am. 

3. I tried to make a gorgeous bag, based on the design of the art tote I
made.  Well, to say that I messed it up would be an understatement.  My
sewing machine and I are no longer on speaking terms and while yes, it
MAY have been my fault, Fred (the sewing machine) wasn't being
helpful.  He sustained a slew of abusive language and is now sitting in
the corner.

4. So, I decided to fuse some plastic bags.  However, I forgot to turn down the heat setting and it was still on linen from the first bag and it completely shredded the bags.  It was tesco soup, all over my ironing board…lovely. We don't use many plastic bags, so I couldn't retry.  I did consider ordering my next grocery shop with bags, but that really defeats the purpose of green crafting, hey?

5. I have been meticulously uploading the archives from the old site and I lost and will have to re upload about 15 posts.  It is so mind-numbingly boring that I may have to wait.  I am up to July of last year, which isn't bad.

6.  After all of that, I decided to put on my wellies and try to tidy up the garden.  as I was walking outside, I stepped on a dead mouse that the cats brought me.  "Eeew!" is not nearly comprehensive enough.

I am going to go upstairs for a restart, put on the bath, make a cup of tea and dig into one of these:

DSC00146

It seems that today is not my day for doing, so I may have to concentrate on being.

(sorry the pictures are worse than usual, Kev took my camera!)

with 2 Comments

Fused Plastic Art Tote

Look what I made!!!! I really wanted something to haul art stuff up and down stairs. Well, necessity, plus the fused plastic sheets I did last week, plus my sewing machine, equals:

P1040299

I am impressed with myself!!! However, I only had smallish sized sheets lying around, so I will need to try and fuse larger ones to make a larger bucket (or 10) for all of my stuff.

If you want to learn more about fused plastic, you can here

Anyway, I am so tired!!! E man hasn’t really been sleeping, Kevin has been working until 3 in the morning, and I am trying to do too much. I just need to collapse in a heap!

P1040283

Its a busy weekend this weekend, so I may not be posting. Have a good one!

with 1 Comment

I know you want one!

P1040296

Forget about Tiffany's. I have a salt dough bead and button necklace! So how do YOU get one of your very own??? Well, I'll tell you:

Ingredients:

Salt Dough: 1 cup salt 1 cup flour 1 T. oil aprox 1/2 cup of warm water

Poster Paint

Large Buttons

Twine (or pipe cleaners) 

Toddler (optional)

1. make up the salt dough. I do this by having Ellis measure the dry ingredients (with help) and mixing them together. Then add the oil for elastcity, then the warm water. Add water bit by bit, mixing as you go until the dough is a good pliable consistency.

2. make into bead shapes. we did this a number of ways. by rolling balls and leaving them. by rolling balls and flattening them. by rolling the dough into a worm shape and cutting them with a butter knife. E Man hellped by giving me the dough to roll, by flattening the balls and doing the cutting with the butter knife.

3. lay them out on a cookie sheet. We used our silpat baking tray liner, but they would be fine on any non-stick surface.

P1040246

4. Poke holes in each bead. For older kids, you could easily use a skewer, but as Ellis is only 21 months, we used a 1/4in dowel. Ellis helped poke the holes, but it was a very violent experience that I would not want to repeat anytime soon. No one was injured, but some of the beads had to be made 3 and 4 times!

5. Bake in the oven at 100 deg celsius (about 200 deg Fahrenheit). Ours took 2 hours and were about 1/2 in thick. the smaller the beads are the shorter baking time is. When they are dry, just turn the oven off and let them cool so they don't crack.

6. Painting them was the tricky part. I couldn't figure out how to have Ellis participate. we tried putting splodges on paper for dunking. We tried using a paint brush. We tried just shaking the paint over them. Then I had the miraculous idea of putting them in a plastic baggie with paint and shaking them. It worked a treat.

P1040254
P1040261
P1040269

7. We laid them out on baking paper to dry for a couple of hours.

P1040279

8. Then the fun begins. Ellis picked out some bright buttons from my tin. He really liked laying them out and organising them before stringing them. I used simple packing twine, with a very large darning needle (rounded tip, of course) but you could use pipe cleaners, but they are hard to get here. If I would have had wire in the house, I might have tried that as we did struggle a bit with the stringing.

P1040293

each step really engaged with a lot of the things he is want to do and explore at the moment:cooking, painting, stringing. He kept calling the beads his "balls" and was asking all morning if we could make more…too bad I've run out of salt!!

with 13 Comments

Sorry, too busy to talk

We have had a busy busy morning.  There are some major plans afoot around here…more will be revealed soon!  However, here is a flavour:

Mosaic6694943

I got this great tutorial from Let's Explore. It was sooo easy with contact paper and paint.  I am now thinking pink and red hearts for valentines on handmade paper….ooohhh!

We also tried apple printing… It started well:

P1040236

But got a bit confusing:

P1040238

We also started a new project.  We shall see if my plan works…

P1040245

And after all of that, E man wanted his kitchen out.  Pasta e fagoli anyone?

P1040248

Well, now I need to get dressed, get ready for an afternoon of saving the environment (at work, of course) and deal with this:

P1040249

Leave a comment